How to Install an Attic Access Bulkhead
Share
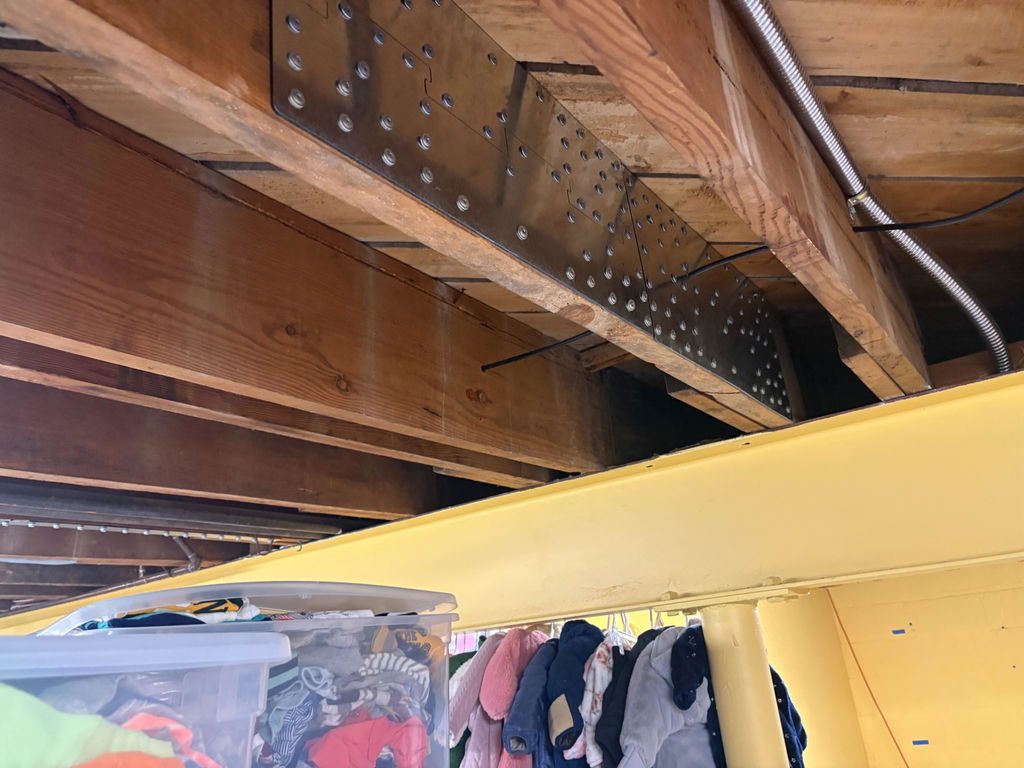
Install Nolan’s Attic Access Bulkhead around a finished-ceiling attic opening only after confirming that the project matches an applicable sealed design report. The current requirements specify a 54-inch × 22½-inch maximum rough opening, 40 Simpson Strong-Tie SDS25200 screws, intact truss webs, and a complete inspection before the designated framing segment is cut.
- Confirm roof span, pitch, ground snow load, wind exposure, framing, and the applicable sealed report before installation.
- The maximum approved rough opening is 54 inches × 22½ inches.
- Install 10 SDS25200 screws in every side plate—40 screws total—and fasten only into sound wood.
- Do not cut or alter truss webs.
- Install, tighten, inspect, and obtain required acceptance before removing the designated bottom-chord or ceiling-joist segment.
What does “finished-ceiling opening” mean for this product?
The Attic Access Bulkhead is an interior steel frame installed around a proposed attic opening where a qualifying ceiling joist or truss bottom chord will be interrupted. The steel frame transfers roof-spread tension around that opening.
It is not the attic door, stair, trim, or finish package. It is also not a rooftop hatch, curb, flashing system, exterior enclosure, or weatherproof roof-access product.
The finished ceiling makes layout, access, wiring, plumbing, insulation, and finish protection important, but it does not change the product’s structural purpose or approved sequence.
Confirm project applicability before starting
Nolan’s current installation instructions require the installer to confirm that these project conditions fall within the applicable sealed design report:
- Roof span.
- Roof pitch.
- Ground snow load.
- Wind exposure.
- Existing framing.
Use the current field-reference table with the sealed report and approved permit documents that apply to the project; the field sheet does not replace them.
The current maximum approved rough opening is 54 inches long × 22½ inches wide.
Required components
The current instructions list:
- Two HSS 4 × 2 × 3/16 side beams.
- Four sliding saddle-and-plate assemblies.
- Two threaded rods, each 3/4 inch in diameter and 3 feet long.
- Eight 3/4-inch nuts.
- Eight 3/4-inch flat washers.
- Eight 3/4-inch lock washers.
- Forty Simpson Strong-Tie SDS25200 structural screws.
Each of the four side plates receives 10 SDS25200 screws. Install a screw in every hole. Do not substitute fasteners or omit holes.
Step 1: Lay out the opening
Locate the proposed opening and verify required clearances. Identify every bottom chord or ceiling joist affected by the opening.
Confirm that:
- The rough opening will not exceed 54 inches × 22½ inches.
- No truss web will be cut or altered.
- Only the designated bottom-chord or ceiling-joist segment will be removed.
- Wiring, plumbing, insulation, and finished surfaces are identified and protected.
- Safe attic access, lighting, and personal protective equipment are available.
Work affecting engineered trusses or structural framing must be performed by qualified personnel under the approved project documents.
Step 2: Pre-assemble the frame
Slide two saddle assemblies onto each side beam. Insert one threaded rod through each end of the frame.
At both sides of each rod, install:
- A flat washer.
- A lock washer.
- A nut.
Leave the assemblies loose enough to position the frame. Do not modify the steel parts or substitute unapproved components.
Step 3: Position the frame above the existing framing
Place one side beam on each side of the proposed rough opening. The side beams remain outside the opening.
Center the frame, keep the beams parallel, and align all four side plates flat against the affected bottom chords or ceiling joists. The sliding saddles allow the connection points to line up with the qualifying framing.
If a side plate cannot bear flat against sound wood, stop. Do not compensate by omitting screws, using damaged wood, altering a plate, or moving the cut outside the approved layout.
Step 4: Fasten every side plate
Install 10 Simpson Strong-Tie SDS25200 screws through each side plate into sound wood, for 40 screws total.
Follow all three current requirements:
- Use SDS25200 screws.
- Install a screw in every hole.
- Fasten only into sound wood.
Do not substitute another screw, skip a hole, or fasten into damaged framing.
Step 5: Tighten the threaded rods
Confirm the frame remains aligned, the side beams remain parallel, and the plates bear flat against the framing.
Tighten the nuts evenly at both ends. Fully seat each flat washer and lock washer. Do not distort the steel members or wood framing.
The current instructions do not provide a generic torque value. Do not invent one or use a general torque chart as a substitute for Nolan’s approved instructions.
Step 6: Inspect before cutting
Inspect all four side-plate connections and both threaded-rod assemblies. Confirm:
- The bulkhead matches the approved product design.
- Both side beams are parallel and clear of the opening.
- All four side plates bear flat against sound framing.
- All 40 SDS25200 screws are fully seated.
- Both rods have nuts, flat washers, and lock washers on each side.
- No truss web, plate, or unintended framing has been cut.
- The rough opening does not exceed 54 inches × 22½ inches.
- Required project acceptance has been obtained.
Only after the complete bulkhead has been installed, tightened, inspected, and accepted may the designated bottom-chord or ceiling-joist segments be removed.
When must work stop?
Stop work and contact the engineer if:
- Existing framing is damaged.
- Framing differs from the approved design.
- Project conditions fall outside the sealed report.
- Any side plate cannot receive every specified fastener.
- A truss web would need to be cut or altered.
- The opening would exceed the current approved maximum.
Do not redesign the connection in the field.
FAQ
What is the largest approved rough opening?
Nolan’s current documents specify a maximum rough opening of 54 inches × 22½ inches.
Which screws are required?
Use 40 Simpson Strong-Tie SDS25200 screws—10 in every side plate, with every hole filled in sound wood.
Can I leave some plate holes empty?
No. Nolan’s current instructions require a screw in every hole, for 10 screws per plate and 40 total.
Can a truss web be cut?
No. Truss webs must remain intact and may not be cut or altered.
When can the bottom chord or ceiling joist be cut?
Only after the complete bulkhead is installed, tightened, inspected, and accepted under the applicable project documents.
Does this install the attic hatch or stairs?
No. This article covers the structural bulkhead around the opening, not the hatch, stair, trim, insulation, or finish system.
One last thing
The controlling sequence is simple: verify the project, install every specified component and fastener, inspect the complete bulkhead, and only then cut the designated framing segment.